Consumable Condition - What to look for & when to replace
Posted: Tue May 19, 2020 11:33 am
Consumable condition is very important to maintain the best possible cuts consistently once you have everything dialed in and cutting well. When many think of consumables they think of the electrode and the nozzle and often ignore items like swirl rings, start cartridges, shields, etc. Although nozzle's and electrodes are the fastest wearing and most commonly replaced parts in the consumable set, all consumable items should be inspected at each change interval and cleaned or replaced if needed. Start cartridges and swirl rings that require replacement can cause issues when the plasma tries to fire, and shields with plugged or damaged orifices can cause edge angularity issues, both issues can be frustrating but easily resolved with regimented consumable inspections. Below we will go over the consumable items on the most commonly used plasma cutters and when to replace them.
Nozzle

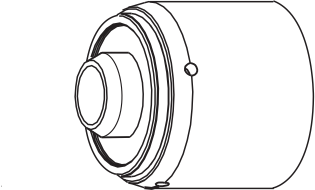
The nozzle shown is from the Hypertherm 65 manual and is a simple part that is very easy to damage and its condition is critical when it come to achieving a square cut edge. You can destroy a nozzle before you have even cut 1 inch if your air supply is contaminated with oil and/or moisture, if you are piercing to high or low, or have your amperage set incorrectly for the nozzle you have selected. I have heard so many times that "I just put in a new nozzle so that can't be the problem" but it certainly can be and often is. Things to keep in look for and keep in mind when it comes to nozzles are:
1- If the hole in the center is no longer perfectly round you will never cut a square edge, there will always be a taper going in a particular direction based on what side of the hole has blown out in the nozzle. For example, if you were cutting a square you might find that the top and bottom edges of the square look great, but the left and right-side cuts are tapered in the same direction. This is a sure sign that the nozzle hole is out of round and needs to be replaced.
2- If you look inside the nozzle and see black or grey deposits swirling down towards the hole in the center, this is a sure sign that your air supply is contaminated with oil, moisture, or both. You will need to improve your air filtration to eliminate this, or you will never achieve quality and consistency in your cuts. When oil and moisture is in the air supply, the plasma arc will incinerate it and the additional uncontrolled heat WILL destroy your nozzle. This can happen to a new nozzle on the first pierce before anything has even been cut and cost you more in consumables than a good filter system would. A popular filter system used by many on Pspider members is the Sharpe 6760 3-Stage Filter/Dryer
3- Do not run a higher amperage than the nozzle is rated for, this will dramatically reduce the life of the nozzle. Stick to your cut charts for the proper amperage and settings to be used with each nozzle.
Electrode

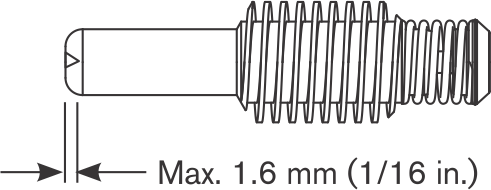
The electrode shown is from the Hypertherm 65 manual, your electrode may look different than this, but it serves the same purpose of providing power to the plasma arc and conducting high voltage energy during the starting sequence.
It is common for operators to overuse these since wear is not as obvious and it takes very little measured wear before they are considered used up. Compare a new electrode to a used one and you will see a shiny insert in the center of the copper, this is a hafnium insert where the arc is emitted. This hafnium will wear during normal use and a pit will form in end of it, if you let this pit wear too deep a catastrophic failure may occur which can ruin your torch and be very expensive. Hypertherm suggests replacing the electrode once the pit has reached a depth of 1/16".
Electrodes often last longer than nozzles and do not necessarily need to be replaced at the same time as a nozzle. You may find that you can use 1 electrode to every 2 nozzles depending on what your cutting, how well your setup is dialed in, how good your air quality is, etc. Just inspect the hafnium wear and replace as needed.
Swirl Ring

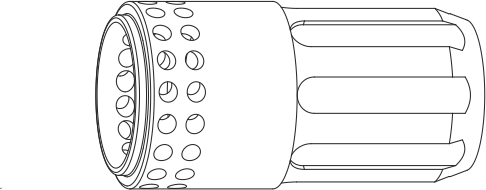
Ok, so not all plasma cutters have swirl rings like you see pictured above from the Hypertherm 65 manual, however a large majority of the PlasmaSpider community do use Hypertherm air plasma cutters so we will cover this here.
The main job of the swirl ring is to control the gas (compressed air for most of us) and swirl it around the electrode and into the nozzle which serves many purposes such as controlling the plasma arc and protecting the nozzle. In addition to this the swirl ring will align the electrode with the nozzle and is a critical component when it comes to starting the arc in the air plasma cutters most of us use.
Be sure to keep the swirl ring clean and inspect it during consumable changes for cracks or damage and replace if any is damage is present. It is also important to confirm that your electrode is able to move freely inside of it. If your electrode sticks in the swirl ring you will have issues with your arc starting on time if it starts at all and the swirl ring will need to be replaced.
Start Cartridge

If you operate a Thermal Dynamics, Victor, or Easb plasma cutter the start cartridge is something you will be familiar with and can cause a lot of grief if it is not in good working condition. You want to be sure that the spring-loaded ring in the center moves freely up and down and that the entire cartridge is clean and free of any damage or it should be replaced.
What you will notice with these is that the spring-loaded ring in the center has a tapered edge on the end of it that sits inside the top edge of the nozzle. During the arc start process the air pressure will lift this spring loaded ring off the nozzle and over time some pitting can occur on this tapered edge causing it to stick inside the nozzle and not lift up as it should. When this happens, you will experience problems with the arc starting and you can either replace the cartridge or smooth the tapered section of the spring loaded ring with a scotch brite pad to resolve the issue.
Shield

You may be familiar with shielded and un-shielded consumables and either setup can be used to achieve great results. If you choose to use a shield it is important to inspect it during consumable changes as well. If your not sure what setup to run you can't go wrong with the shielded setup as it protects the nozzle from molten metal blowing back during the pierce delay which is very important on thicker materials and it also helps to achieve a squarer cut edge. Some prefer to use the un-shielded setup on thinner materials that use short pierce delays and close torch to material work distance.
The main shield orifice is in the center, this orifice must be perfectly round with sharp edges to function properly, and the most common cause of damage to this is piercing too close to the material. For this reason, refer to your cut charts for correct pierce height and periodically measure to be sure your machine is maintaining that. The orifices around the circumference of the shield are the bleed orifices and are important to control cut edge angularity. The bleed orifices are small and easily plugged with slag and debris, so it is important to inspect the shield and keep these orifices clean and open to maintain the best cut quality.
Torch O-ring

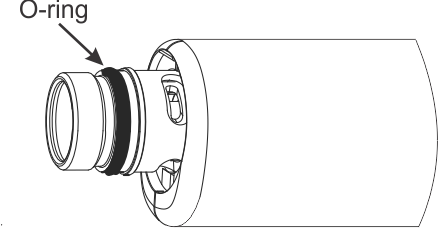
The O-ring shown above from the Hypertherm 65 manual can be found on the end of the torch under the retaining cap once the cap is removed on our air plasma cutters. It is important to inspect this O-ring to be sure it is not dry, damaged, worn, dirty, or over lubricated. O-rings are inexpensive and important to how the torch operates so be sure not to ignore it and keep it lubricated so the retaining cap glides on over top but DO NOT over lubricate. Keep these things in mind, maintain your torch properly to save yourself the headaches so many have when starting out.
Good luck and have fun
Nozzle

The nozzle shown is from the Hypertherm 65 manual and is a simple part that is very easy to damage and its condition is critical when it come to achieving a square cut edge. You can destroy a nozzle before you have even cut 1 inch if your air supply is contaminated with oil and/or moisture, if you are piercing to high or low, or have your amperage set incorrectly for the nozzle you have selected. I have heard so many times that "I just put in a new nozzle so that can't be the problem" but it certainly can be and often is. Things to keep in look for and keep in mind when it comes to nozzles are:
1- If the hole in the center is no longer perfectly round you will never cut a square edge, there will always be a taper going in a particular direction based on what side of the hole has blown out in the nozzle. For example, if you were cutting a square you might find that the top and bottom edges of the square look great, but the left and right-side cuts are tapered in the same direction. This is a sure sign that the nozzle hole is out of round and needs to be replaced.
2- If you look inside the nozzle and see black or grey deposits swirling down towards the hole in the center, this is a sure sign that your air supply is contaminated with oil, moisture, or both. You will need to improve your air filtration to eliminate this, or you will never achieve quality and consistency in your cuts. When oil and moisture is in the air supply, the plasma arc will incinerate it and the additional uncontrolled heat WILL destroy your nozzle. This can happen to a new nozzle on the first pierce before anything has even been cut and cost you more in consumables than a good filter system would. A popular filter system used by many on Pspider members is the Sharpe 6760 3-Stage Filter/Dryer
3- Do not run a higher amperage than the nozzle is rated for, this will dramatically reduce the life of the nozzle. Stick to your cut charts for the proper amperage and settings to be used with each nozzle.
Electrode

The electrode shown is from the Hypertherm 65 manual, your electrode may look different than this, but it serves the same purpose of providing power to the plasma arc and conducting high voltage energy during the starting sequence.
It is common for operators to overuse these since wear is not as obvious and it takes very little measured wear before they are considered used up. Compare a new electrode to a used one and you will see a shiny insert in the center of the copper, this is a hafnium insert where the arc is emitted. This hafnium will wear during normal use and a pit will form in end of it, if you let this pit wear too deep a catastrophic failure may occur which can ruin your torch and be very expensive. Hypertherm suggests replacing the electrode once the pit has reached a depth of 1/16".
Electrodes often last longer than nozzles and do not necessarily need to be replaced at the same time as a nozzle. You may find that you can use 1 electrode to every 2 nozzles depending on what your cutting, how well your setup is dialed in, how good your air quality is, etc. Just inspect the hafnium wear and replace as needed.
Swirl Ring

Ok, so not all plasma cutters have swirl rings like you see pictured above from the Hypertherm 65 manual, however a large majority of the PlasmaSpider community do use Hypertherm air plasma cutters so we will cover this here.
The main job of the swirl ring is to control the gas (compressed air for most of us) and swirl it around the electrode and into the nozzle which serves many purposes such as controlling the plasma arc and protecting the nozzle. In addition to this the swirl ring will align the electrode with the nozzle and is a critical component when it comes to starting the arc in the air plasma cutters most of us use.
Be sure to keep the swirl ring clean and inspect it during consumable changes for cracks or damage and replace if any is damage is present. It is also important to confirm that your electrode is able to move freely inside of it. If your electrode sticks in the swirl ring you will have issues with your arc starting on time if it starts at all and the swirl ring will need to be replaced.
Start Cartridge

If you operate a Thermal Dynamics, Victor, or Easb plasma cutter the start cartridge is something you will be familiar with and can cause a lot of grief if it is not in good working condition. You want to be sure that the spring-loaded ring in the center moves freely up and down and that the entire cartridge is clean and free of any damage or it should be replaced.
What you will notice with these is that the spring-loaded ring in the center has a tapered edge on the end of it that sits inside the top edge of the nozzle. During the arc start process the air pressure will lift this spring loaded ring off the nozzle and over time some pitting can occur on this tapered edge causing it to stick inside the nozzle and not lift up as it should. When this happens, you will experience problems with the arc starting and you can either replace the cartridge or smooth the tapered section of the spring loaded ring with a scotch brite pad to resolve the issue.
Shield

You may be familiar with shielded and un-shielded consumables and either setup can be used to achieve great results. If you choose to use a shield it is important to inspect it during consumable changes as well. If your not sure what setup to run you can't go wrong with the shielded setup as it protects the nozzle from molten metal blowing back during the pierce delay which is very important on thicker materials and it also helps to achieve a squarer cut edge. Some prefer to use the un-shielded setup on thinner materials that use short pierce delays and close torch to material work distance.
The main shield orifice is in the center, this orifice must be perfectly round with sharp edges to function properly, and the most common cause of damage to this is piercing too close to the material. For this reason, refer to your cut charts for correct pierce height and periodically measure to be sure your machine is maintaining that. The orifices around the circumference of the shield are the bleed orifices and are important to control cut edge angularity. The bleed orifices are small and easily plugged with slag and debris, so it is important to inspect the shield and keep these orifices clean and open to maintain the best cut quality.
Torch O-ring

The O-ring shown above from the Hypertherm 65 manual can be found on the end of the torch under the retaining cap once the cap is removed on our air plasma cutters. It is important to inspect this O-ring to be sure it is not dry, damaged, worn, dirty, or over lubricated. O-rings are inexpensive and important to how the torch operates so be sure not to ignore it and keep it lubricated so the retaining cap glides on over top but DO NOT over lubricate. Keep these things in mind, maintain your torch properly to save yourself the headaches so many have when starting out.
Good luck and have fun